• Meet Paige
  • Contact
  • Work With Me
  • Privacy Policy

My Modern Cookery

Classic Cooking with a Modern Twist

  • Appetizers
  • Drinks
  • Breads and Doughs
  • Breakfast
  • Desserts
  • Main Dishes
  • Snacks
  • Sides
  • Cookbooks

No-Knead Artisan Rolls

Jump to Recipe
7885shares
  • Share
  • Tweet

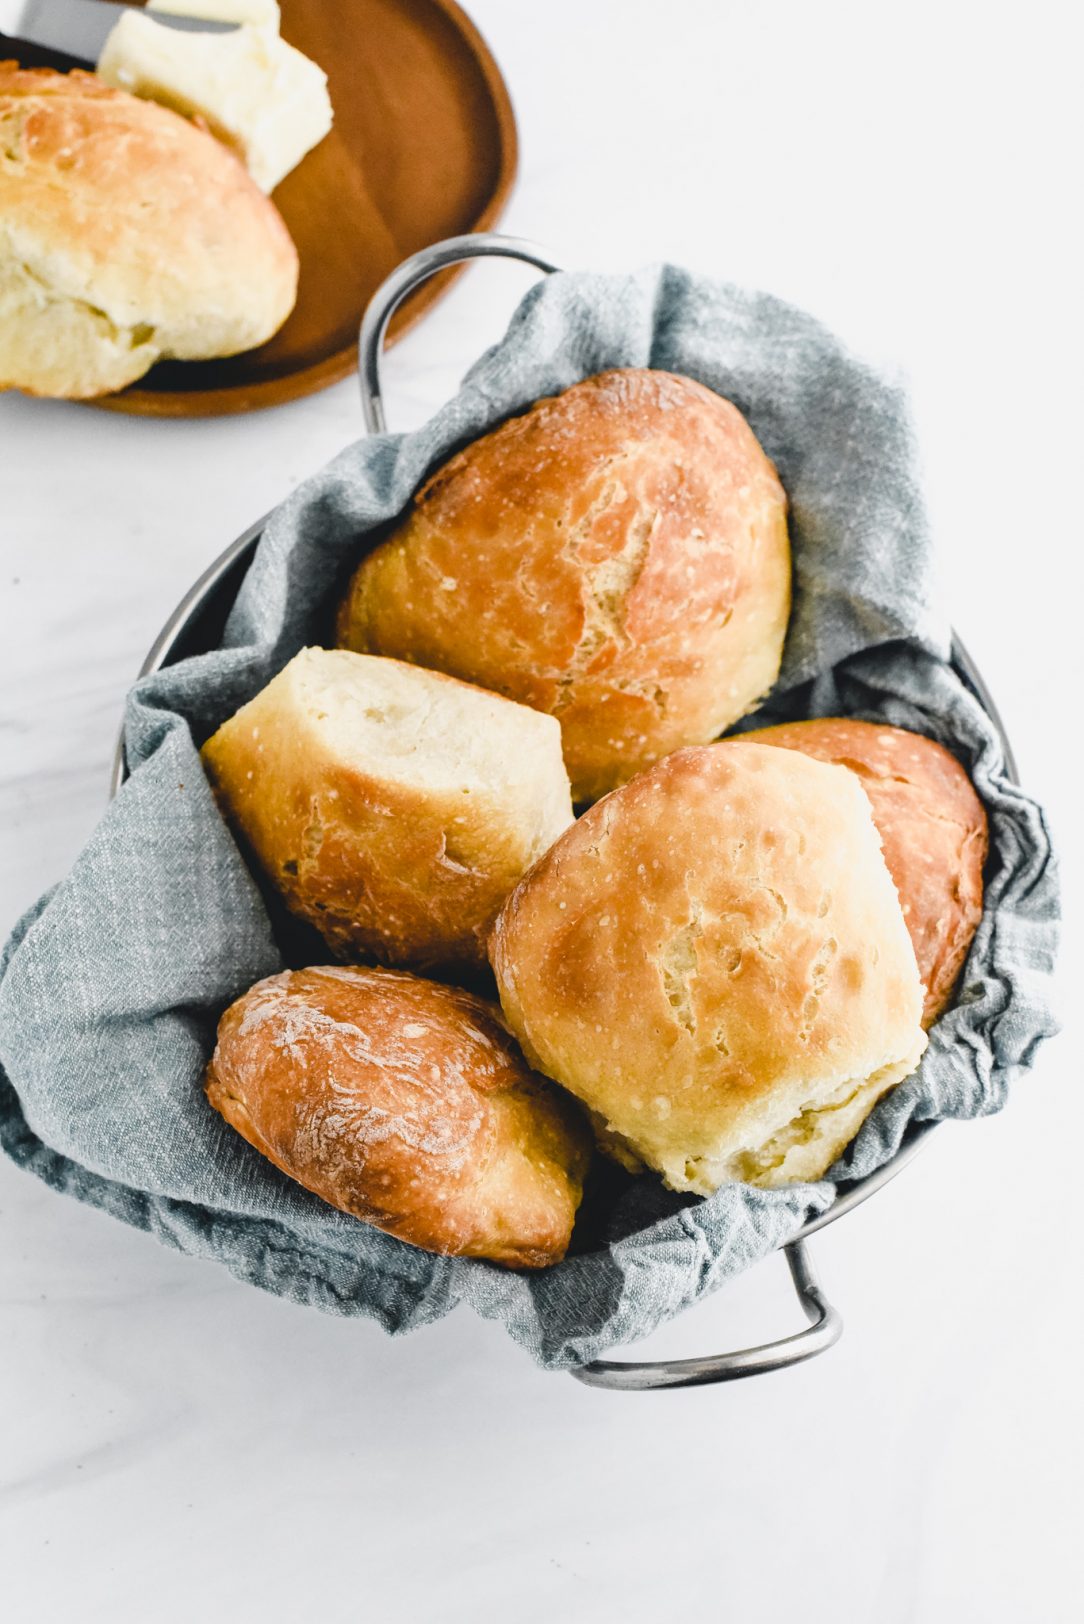
These No-Knead Artisan Rolls are the smaller version of the bread recipe that you can use for burgers, crostini, or avocado toast!

baked rolls in basket

I’m so so so happy to be sharing these No-Knead Artisan Rolls with you!

My absolute favorite bread to make is an easy no-knead bread that you make in the dutch oven. I use a terrible dutch oven and just recently purchased this guy and can’t wait to give it a go!

It’s crusty on the outside, soft on the inside and so versatile. I make it for every holiday or whenever I have a hankering for some fresh bread. The best thing about it is that it’s really easy to add flavorings too.

Possible add-ins

Cinnamon and raisins

Rosemary and garlic

Feta and Olives

Or you can try out the No-Knead Artisan Pickle Bread or Bloody Mary Bread I have in the archives!

I decided that I wanted to have some crusty bread around for avocado toast and after I finished the dough and set it aside to rise, I had an epiphany!

Why not turn this classic bread into rolls for burgers, crostini, or adorable individual dinner loaves!? Now, I’m sure I’m not the only person to ever do this with the bread, but I can’t deny how proud I was for having the thought.

Long story short, they turned out amazing and now I’m obsessed. I’m dying to make a slightly sweet version with bourbon-soaked raisins and spices.

Ingredients & Subs

3 cups all-purpose flour
2-3 teaspoons kosher salt
1/2 teaspoon active dry yeast — You can use instant yeast if you like
1 1/2 cups warm water

I have been loving ordering groceries and having them delivered! I’ve been using instacart and think it’s amazing how much time it frees up for me at home! If you’re interested in freeing up time at home and not having to brave the grocery stores for the rest of the year, give instacart a go.


How to Make

In a large bowl, stir together the flour, salt, and yeast. Stir in water using a wooden spoon until the mixture forms a shaggy dough. But, don’t over-work the dough, you want it to be just combined.

Cover bowl tightly with plastic wrap. I try to stay away from single-use plastic and find these beeswax wraps to work just as good! Let dough sit at room temperature for 8-24 hours to rise. I like to store mine in an “off” oven.

After the dough has risen and has little air pockets, preheat the oven to 450 degrees F.
Place your Dutch oven into the preheated oven for 30 minutes. Do not skip this step.

While your Dutch oven preheats, turn the dough out onto a well-floured surface. With floured hands, form the dough into a ball. Divide into 6 equal-sized pieces and gently form into round balls. Cover dough loosely and let rest.

After the 30 minutes are up, CAREFULLY remove the Dutch oven. With floured hands, place in dough balls.

Replace cover and bake for 30 minutes covered. Carefully remove the cover and bake for an additional 10-15 minutes, uncovered. I find that mine takes about 12 minutes, but just keep an eye on them.

Allow them to cool slightly and transfer to a cooling rack. Slice in half horizontally to use as a burger or sandwich roll or cut in vertical diagonal slices for crostini. The possibilities are endless!

baked rolls stacked

How to store

Bread is best stored on the counter. I like to wrap loosely in foil or use a bread box if possible. If you anticipate that you won’t eat all of the rolls within 2-3 days, I would preemptively freeze because bread freezes so well!

The great thing about these is that you can pop one out when you want and leave the others in the freezer. Just place them in a freezer bag (these Stasher Silicone Freezer Bags are amazing!) wrapped up in plastic and foil all while pushing as much air out as possible. If you have a vacuum sealer, even better! They’ll be perfect for 2-3 months in the freezer. 

baked rolls in dutch oven

Hot Tip

After the dough has risen, you’ll turn the dough out onto a floured surface and form into a rough ball. When I say that, I don’t mean that you’re going have a ball of kneaded dough like pizza dough or something. Remember, “no-knead”.

Flour the turned out dough well and form it just enough so that you can make 6 equal-sized portions. Then, you can just drop the portions into the hot dutch oven. I hope that makes sense! I’ll film a video soon to show exactly how to do it. 

stacked baked rolls

More Baking Recipes You’ll Love!

Molasses Dinner Rolls

No-Knead Artisan Pickle Bread

Pretzel Bread with Pimento Beer Cheese

Herbed Pull-Apart Bread

Cheesy Breakfast Monkey Bread with Sausage and Eggs

baked rolls in dutch oven baked roll on plate with butter and knife

I hope you enjoy this recipe! Take a browse around the site and please let me know if you make anything by leaving a comment and rating the recipe below. Don’t hesitate to reach out if you have any questions, concerns, or requests!

Continue to Content
No-Knead Artisan Rolls

No-Knead Artisan Rolls

Yield: 6
Prep Time: 12 hours
Cook Time: 45 minutes
Total Time: 12 hours 45 minutes
These No-Knead Artisan Rolls are the smaller version of the bread that you can use for burgers, crostini, or avocado toast!

Ingredients

  • 3 cups all-purpose flour
  • 2-3 teaspoons kosher salt
  • 1/2 teaspoon active dry yeast
  • 1 1/2 cups warm water

Instructions

  1. In a large bowl, stir together the flour, salt, and yeast. Stir in water using a wooden spoon until the mixture forms a shaggy dough. But, don't over-work the dough, you want it to be just combined.
  2. Cover bowl tightly with plastic wrap. Let dough sit at room temperature for 8-24 hours to rise. I like to store mine in an "off" oven.
  3. After the dough has risen and has little air pockets, preheat the oven to 450 degrees F.
  4. Place your Dutch oven into the preheated oven for 30 minutes. Do not skip this step.
  5. While your Dutch oven preheats, turn the dough out onto a well-floured surface. With floured hands, form the dough into a ball. Divide into 6 equal-sized pieces and gently form into round balls. Cover dough loosely and let rest.
  6. After the 30 minutes are up, CAREFULLY remove the Dutch oven. With floured hands, place in dough balls.
  7. Replace cover and bake for 30 minutes covered. Carefully remove the cover and bake for an additional 10-15 minutes, uncovered. I find that mine takes about 12 minutes, but just keep an eye on them.
  8. Allow them to cool slightly and transfer to a cooling rack. Slice in half horizontally to use as a burger or sandwich roll or cut in vertical diagonal slices for crostini. The possibilities are endless!

Notes

See the blog post above.

Did you make this recipe?

Please leave a comment on the blog or share a photo on Pinterest

© Paige
Cuisine: American / Category: Breads and Doughs

No-Knead Artisan Rolls

No-Knead Artisan Rolls
7885shares
  • Share
  • Tweet

Breads and Doughs// Sides22 Comments

Search for more recipes!

« Pumpkin Cheesecake Streusel Bread
Pull-Apart Chili Dog Pigs in a Blanket »

Comments

  1. Andrea says

    March 1, 2017 at 1:56 pm

    Does one have to prepare the Dutch oven before preheating, like grease or flour?

    Reply
    • Paige says

      March 2, 2017 at 12:48 am

      Hi, Andrea! If your Dutch oven isn’t enameled you can lay a circle of parchment down, but if it is, you’re good to go!

      Reply
      • Barry Cramer says

        March 27, 2020 at 5:29 pm

        Thank you Paige I was wondering on how I was going to get around to NOT staining my wifes dutch oven . Whew this is a .load off my mind

        Reply
  2. Barb says

    March 4, 2017 at 6:46 pm

    What size dutch oven did you use?

    Reply
    • Paige says

      March 7, 2017 at 8:46 pm

      It’s a 7-quart, Barb!

      Reply
  3. Valentine says

    April 26, 2017 at 1:38 am

    Oh. My. God. THANK YOU SO MUCH FOR THIS TECHNIQUE!!!
    I have been trying to make bread for years! And for several reasons, it actually never worked, and I had lost faith in me ever succeeding in making bread a day. Until I read your recipe. I just baked my first REAL bread and I want to make another one right now, that’s how much it makes me happy!!
    Thank you so much again!!

    Reply
    • Paige says

      April 30, 2017 at 9:25 pm

      That’s so wonderful, Valentine! It’s such a staple in my house and I have to bring it for every holiday or I’m not allowed to come. Haha. I’m so pleased to hear you liked it!

      Reply
  4. Emily says

    April 18, 2018 at 1:41 pm

    What can I use in place of a Dutch oven? I don’t have one. Thanks!

    Reply
    • Paige says

      April 19, 2018 at 5:11 pm

      Hi, Emily! I’ve personally never tried this recipe in anything other than a dutch oven. Part of the unique cooking process is warming the dutch oven before adding the rolls to get that crusty exterior. However, I have had a reader try it a regular 9×9 baking pan with success. I hope that helps!

      Reply
  5. Mel says

    October 2, 2018 at 5:09 pm

    If I wanted to add in garlic and rosemary, at which step would I do it? I have fresh garlic and fresh rosemary. Would that work?

    Reply
    • Paige says

      October 2, 2018 at 7:10 pm

      Hi Mel! You can stir it into the flour before adding the water. Good luck!

      Reply
  6. Byron says

    November 18, 2018 at 6:27 pm

    So delighted to see this. I have been making the Jim Lahey no knead bread for years and always thought it would be fun to make rolls with the same recipe but have never tried it. Actually ordered some cast iron muffin tins on Amazon but then found this and cancelled the order. I notice you add more salt (2-3 teaspoons instead of 1 1/4). Also, would love to try the garlic/rosemary and cinnamon/raisin add-ins … can you provide some more counsel on that? Thanks again!

    Reply
  7. Sue says

    March 27, 2019 at 2:43 pm

    This is the fourth artisan roll recipe I have tried and it is by far the best and easiest one! I just took six beautifully crusty rolls (soft on the inside) out of the oven and tried one after cooling them a bit. They not only look amazing, they taste great. I followed your recipe and made only one minor change: I added 1/2 cup rye flour to 2 1/2 cups of white flour for more of a robust flavor. Thank you for such an amazing recipe!

    Reply
    • Paige says

      March 28, 2019 at 5:19 pm

      Aww. 🙂 Thank you so much for the nice comment. The addition of the rye flour sounds amazing! I’m so glad you enjoyed them!

      Reply
  8. Lena Gilkey says

    April 7, 2019 at 12:30 pm

    I made my first batch of this recipe yesterday, and just mixed up a double batch this morning. My granddaughters loved them. I can’t wait to make them again when I make another favorite of theirs, vegetable beef soup. They’ve a crusty roll or bread with the soup.

    Reply
    • Paige says

      April 7, 2019 at 4:07 pm

      So happy your granddaughters loved them! Thanks so much for checking out the recipe and leaving the nice comment. Have a wonderful day!

      Reply
  9. Sarah says

    September 17, 2019 at 10:35 pm

    I’ve been making bread in my Dutch oven for almost a year now, and haven’t bought any bread in all that time. But I started missing buns lately, and this makes it sound so easy. Will use the dough I already have rising, am kinda excited!
    One question: of the additions you mention at the top, olives and feta stood out to me. I’ve been making an olive and garlic bread, using about 1 cup of chopped olives, 1-1½ tbsp chopped garlic, and 1 tsp garlic powder to a 580g flour mix (~4 cups)…. Could I just replace the garlic with feta? I’d really like to try such a bread, sounds delicious.

    Reply
    • Paige says

      September 18, 2019 at 12:08 am

      Absolutely! You could probably even get away with adding up to 1/4 cup of feta. Let me know how it turns out.

      Reply
  10. Britt says

    May 5, 2020 at 6:21 pm

    Hi Paige,

    I love your recipe! However, I have some trouble making the ‘dough ball’. After the dough has risen for 18 hours, the dough is so sticky that I can not form a proper ball. The dough almost drips off my hands, does not stay in place, and does not feel firm at all. I have made a handful of times no-knead loaves of bread before. However, when I made a loaf, I would just move the dough into my Dutch oven without creating a dough ball first. Do you know what I am doing wrong? Or how can I make the dough firm enough to form a ball?

    Thank you!

    Reply
  11. Ryan says

    December 24, 2020 at 2:26 am

    Made some of these today and they did not disappoint! I can’t wait to experiment with this recipe further.

    Reply
    • Paige says

      December 28, 2020 at 8:16 pm

      So glad you liked it! It’s one of my favorites!

      Reply

Trackbacks

  1. Ham, Mushroom and Spinach Strata - says:
    October 11, 2018 at 12:49 am

    […] Paige on No-Knead Artisan Rolls […]

    Reply

Leave a Reply Cancel reply

Your email address will not be published. Required fields are marked *

This site uses Akismet to reduce spam. Learn how your comment data is processed.

Search for More Recipes!

bookcoverbookcover
The Home Cook’s Guide to Journaling: Organize Meal Plans, Grocery Shopping, and Food Budgets with One Notebook

Top 15 Recipes!

Low-Carb Million Dollar Zoodle Spaghetti

Low-Carb Million Dollar Zoodle Spaghetti

Easy Spicy Chicken Pad Thai

Slow Cooker Garlic Parmesan Spaghetti Squash

Slow Cooker Garlic Parmesan Spaghetti Squash

Pumpkin Carrot Pupcakes

Lavender and Honey soaked Lemon Cake

Lavender and Honey Soaked Lemon Cake

No-Knead Artisan Rolls

Savory Italian Zucchini Bread

Savory Italian Zucchini Bread

No-Knead Artisan Pickle Bread

Whole Wheat Oat Muffins

Molasses Dinner Rolls

Molasses Dinner Rolls

Eggnog Cinnamon Roll Ring

Bacon Cheeseburger Pizza with Dill Pickle Aioli

Bacon Cheeseburger Pizza with Dill Pickle Aioli

Boozy Peach-Blackberry Pie

Lemon Vegetable Pasta

One Pot Creamy Mushroom Pasta

One Pot Creamy Mushroom Pasta

Recent Comments

  • Liza on Savory Italian Zucchini Bread
  • Paige on Easy Spicy Chicken Pad Thai
  • ashok on Best Eggplant Parmesan Pizza
  • Doreen on Easy Spicy Chicken Pad Thai
  • Paige on Brown Butter Bucatini With Scallops and Broccolini
  • Email
  • Facebook
  • Instagram
  • Pinterest
  • Tumblr
  • Twitter

Copyright © 2021 · Savory theme by Restored 316